

在数字内容创建和处理中,去除图像背景是一项常见且必不可少的任务。无论您是从事平面设计、电子商务还是其他任何视觉项目,拥有将对象从背景中分离出来的能力都能拓宽您的创造力。在本文中,我们将探讨如何用 C# 编程移除图像背景。
• 移除图像背景的 C# 库
• 使用自动屏蔽去除图像背景
⭕使用羽化功能进行图形剪切自动屏蔽
⭕在重复自动屏蔽中重新使用默认笔触
⭕使用假定对象数据进行图形剪切自动屏蔽
• 使用手动屏蔽去除背景
去除图像背景的 C# 库
为了去除图像背景,我们将使用 Aspose.Imaging for .NET,这是一个功能强大的库,可为 .NET 应用程序提供广泛的图像处理功能。它支持各种图像格式,允许开发人员轻松执行调整大小、裁剪、旋转等操作,当然也包括移除背景。
您可以下载 API 或从 NuGet 安装。
PM> Install-Package Aspose.Imaging
在 C# 中使用自动屏蔽去除图像背景
要获得更好的去除背景效果,最好使用自动屏蔽方法。其目的是创建一个能准确识别前景和背景像素的遮罩。Aspose.Imaging 提供了三种自动遮罩技术来移除图像中的背景,具体介绍如下。
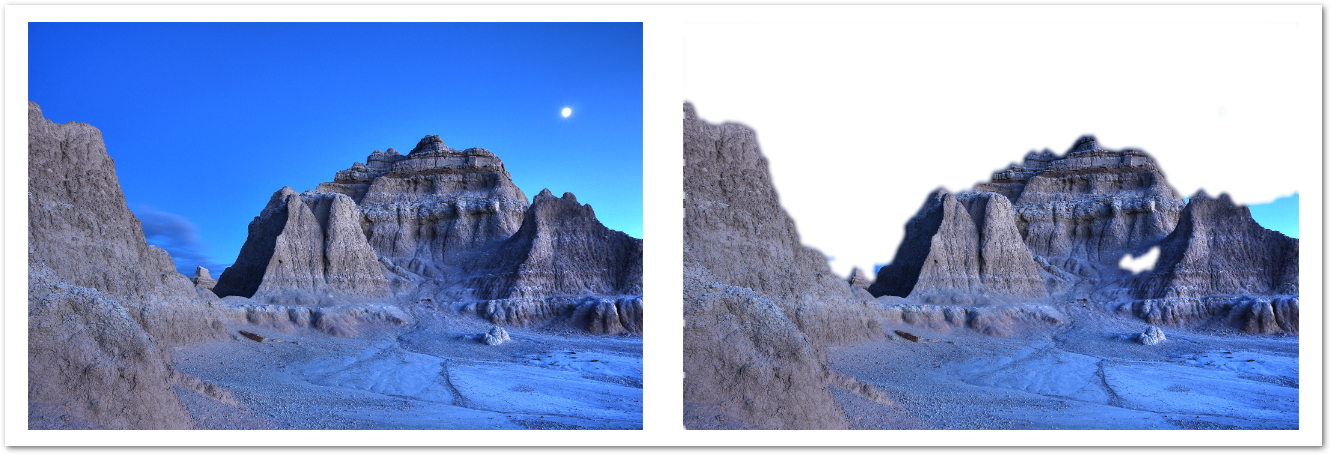
带羽化的图形剪切自动屏蔽
在这种技术中,应用程序接口会根据图像大小执行带羽化的图像屏蔽,并使用自动计算的默认笔画。以下代码片段展示了如何使用带羽化的图形切割自动屏蔽。AutoMaskingGraphCutOptions 的 Args 属性可以省略,因为默认笔触最后会放在这里。
using Aspose.Imaging;
using Aspose.Imaging.FileFormats.Png;
using Aspose.Imaging.ImageOptions;
using Aspose.Imaging.Masking;
using Aspose.Imaging.Masking.Options;
using Aspose.Imaging.Masking.Result;
using Aspose.Imaging.Sources;
using System;
using System.IO;
string templatesFolder = @"c:\Users\USER\Downloads\templates\";
string dataDir = templatesFolder;
MaskingResult results;
using (RasterImage image = (RasterImage)Image.Load(dataDir + "couple.jpg"))
{
// To use Graph Cut with auto calculated strokes, AutoMaskingGraphCutOptions is used.
AutoMaskingGraphCutOptions options = new AutoMaskingGraphCutOptions
{
// Indicating that a new calculation of the default strokes should be performed during the image decomposition.
CalculateDefaultStrokes = true,
// Setting post-process feathering radius based on the image size.
FeatheringRadius = (Math.Max(image.Width, image.Height) / 500) + 1,
Method = SegmentationMethod.GraphCut,
Decompose = false,
ExportOptions =
new PngOptions()
{
ColorType = PngColorType.TruecolorWithAlpha,
Source = new FileCreateSource(dataDir + "result.png")
},
BackgroundReplacementColor = Color.Transparent
};
results = new ImageMasking(image).Decompose(options);
using (RasterImage resultImage = (RasterImage)results[1].GetImage())
{
resultImage.Save(dataDir + "result2.png", new PngOptions() { ColorType = PngColorType.TruecolorWithAlpha });
}
}
File.Delete(dataDir + "result.png");
File.Delete(dataDir + "result2.png");
下面的截图显示了输入和输出图像。
在重复自动屏蔽中重新使用默认笔触
在此技术中,图像遮罩是使用自动计算的默认笔画完成的,不过,API 会在新的遮罩迭代中重复使用遮罩选项。在下面的代码片段中,您可以注意到两个假定对象的数据也是在 AutoMaskingGraphCutOptions 的 AssumedObjects 属性中指定的。根据初始遮罩结果,对应用的背景/前景描边进行调整,并执行后续的遮罩迭代。
using Aspose.Imaging;
using Aspose.Imaging.FileFormats.Png;
using Aspose.Imaging.ImageOptions;
using Aspose.Imaging.Masking;
using Aspose.Imaging.Masking.Options;
using Aspose.Imaging.Masking.Result;
using Aspose.Imaging.Sources;
using System;
using System.Collections.Generic;
using System.IO;
string templatesFolder = @"c:\Users\USER\Downloads\templates\";
string dataDir = templatesFolder;
// To improve masking results, data of the specific objects that should be included in the foreground masking result could be provided.
List<AssumedObjectData> assumedObjects = new List<AssumedObjectData>();
// The object type and the area containing that object should be specified.
assumedObjects.Add(new AssumedObjectData(DetectedObjectType.Human, new Rectangle(0, 0, 300, 300)));
MaskingResult results;
AutoMaskingGraphCutOptions options;
Point[] appliedBackgroundStrokes;
Point[] appliedForegroundStrokes;
Rectangle[] appliedObjectRectangles;
using (RasterImage image = (RasterImage)Image.Load(dataDir + "couple.jpg"))
{
// To use Graph Cut with auto calculated strokes, AutoMaskingGraphCutOptions is used.
options = new AutoMaskingGraphCutOptions
{
AssumedObjects = assumedObjects,
// Indicating that a new calculation of the default strokes should be performed during the image decomposition.
CalculateDefaultStrokes = true,
// Setting post-process feathering radius based on the image size.
FeatheringRadius = (Math.Max(image.Width, image.Height) / 500) + 1,
Method = SegmentationMethod.GraphCut,
Decompose = false,
ExportOptions = new PngOptions()
{
ColorType = PngColorType.TruecolorWithAlpha,
Source = new FileCreateSource(dataDir + "result.png")
},
BackgroundReplacementColor = Color.Transparent
};
using (IMaskingSession maskingSession = new ImageMasking(image).CreateSession(options))
{
results = maskingSession.Decompose();
// Saving intermediate masking result.
using (RasterImage resultImage = results[1].GetImage())
{
resultImage.Save(dataDir + "result2.png",
new PngOptions() { ColorType = PngColorType.TruecolorWithAlpha });
}
// At this point applied foreground/background strokes can be analyzed and based on it additional
// foreground/background strokes can be manually provided.
appliedBackgroundStrokes = options.DefaultBackgroundStrokes;
appliedForegroundStrokes = options.DefaultForegroundStrokes;
appliedObjectRectangles = options.DefaultObjectsRectangles;
// Re-using AutoMaskingGraphCutOptions there is no need to perform default stroke calculations a second time.
// When both default strokes and ObjectsPoints in the Args property of AutoMaskingArgs are provided, Point arrays are end up combined.
// The first ObjectsPoints array is considered to be a background points array and
// the second ObjectsPoints array is considered to be a foreground points array.
// When both DefaultObjectsRectangles and ObjectsRectangles in the Args property of AutoMaskingArgs are provided,
// only the array from the Args is being used.
AutoMaskingArgs newAutoMaskingArgs = new AutoMaskingArgs()
{
ObjectsPoints = new Point[][]
{
// Additionally specifying areas we want to be removed.
GetRectanglePoints(
new Rectangle(100, 100, 35, 90),
new Rectangle(300, 140, 95, 50)
)
},
};
results = maskingSession.ImproveDecomposition(newAutoMaskingArgs);
using (RasterImage resultImage = results[1].GetImage())
{
resultImage.Save(dataDir +
"result3.png",
new PngOptions() { ColorType = PngColorType.TruecolorWithAlpha });
}
}
}
//Examples - graph - cut - repeated - masking - with - new- points.cs
// To improve masking results, data of the specific objects that should be included in the foreground masking result could be provided.
assumedObjects = new List<AssumedObjectData>();
// THe object type and the area containing that object should be specified.
assumedObjects.Add(new AssumedObjectData(DetectedObjectType.Human, new Rectangle(100, 100, 150, 300)));
// First masking iteration is performed to get auto calculated foreground/background brushstrokes.
using (RasterImage image = (RasterImage)Image.Load(dataDir + "couple.jpg"))
{
// To use Graph Cut with auto calculated strokes, AutoMaskingGraphCutOptions is used.
options = new AutoMaskingGraphCutOptions
{
AssumedObjects = assumedObjects,
// Indicating that a new calculation of the default strokes should be performed during the image decomposition.
CalculateDefaultStrokes = true,
// Setting post-process feathering radius.
FeatheringRadius = 3,
Method = SegmentationMethod.GraphCut,
Decompose = false,
ExportOptions =
new PngOptions()
{
ColorType = PngColorType.TruecolorWithAlpha,
Source = new FileCreateSource(dataDir + "result4.png")
},
BackgroundReplacementColor = Color.Transparent
};
results = new ImageMasking(image).Decompose(options);
// At this point applied foreground/background strokes can be analyzed and based on it additional
// foreground/background strokes can be manually provided.
appliedBackgroundStrokes = options.DefaultBackgroundStrokes;
appliedForegroundStrokes = options.DefaultForegroundStrokes;
appliedObjectRectangles = options.DefaultObjectsRectangles;
using (RasterImage resultImage = (RasterImage)results[1].GetImage())
{
resultImage.Save(dataDir + "result5.png", new PngOptions() { ColorType = PngColorType.TruecolorWithAlpha });
}
}
// Second masking iteration is performed to further improve masking quality by adding new manually chosen foreground/background points.
using (RasterImage image = (RasterImage)Image.Load(dataDir + "couple.jpg"))
{
// Re-using AutoMaskingGraphCutOptions there is no need to perform default stroke calculations a second time.
options.CalculateDefaultStrokes = false;
// When both default strokes and ObjectsPoints in the Args property of AutoMaskingArgs are provided, Point arrays are end up combined.
// The first ObjectsPoints array is considered to be a background points array and
// the second ObjectsPoints array is considered to be a foreground points array.
// When both DefaultObjectsRectangles and ObjectsRectangles in the Args property of AutoMaskingArgs are provided,
// only the array from the Args is being used.
options.Args = new AutoMaskingArgs()
{
ObjectsPoints = new Point[][]
{
new Point[] { new Point(100, 100), new Point(150, 100) },
new Point[] { new Point(300, 200) },
},
ObjectsRectangles = new Rectangle[]
{
new Rectangle(100, 100, 300, 300),
}
};
results = new ImageMasking(image).Decompose(options);
// Saving final masking result.
using (RasterImage resultImage = (RasterImage)results[1].GetImage())
{
resultImage.Save(dataDir + "result6.png", new PngOptions() { ColorType = PngColorType.TruecolorWithAlpha });
}
}
/// <summary>
/// Return all points that belongs to the specified rectangles.
/// </summary>
/// <param name="rectangles">The array of rectangles.</param>
/// <returns>All rectangle points.</returns>
static Point[] GetRectanglePoints(params Rectangle[] rectangles)
{
int arraySize = 0;
foreach (Rectangle rectangle in rectangles)
{
arraySize += rectangle.Width * rectangle.Height;
}
Point[] pointArray = new Point[arraySize];
int arrayIndex = 0;
foreach (Rectangle rectangle in rectangles)
{
for (int x = rectangle.Left; x < rectangle.Right; x++)
{
for (int y = rectangle.Top; y < rectangle.Bottom; y++)
{
pointArray[arrayIndex++] = new Point(x, y);
}
}
}
return pointArray;
}
File.Delete(dataDir + "result.png");
File.Delete(dataDir + "result2.png");
File.Delete(dataDir + "result3.png");
File.Delete(dataDir + "result4.png");
File.Delete(dataDir + "result5.png");
File.Delete(dataDir + "result6.png");
下面的截图显示了输入和输出图像。

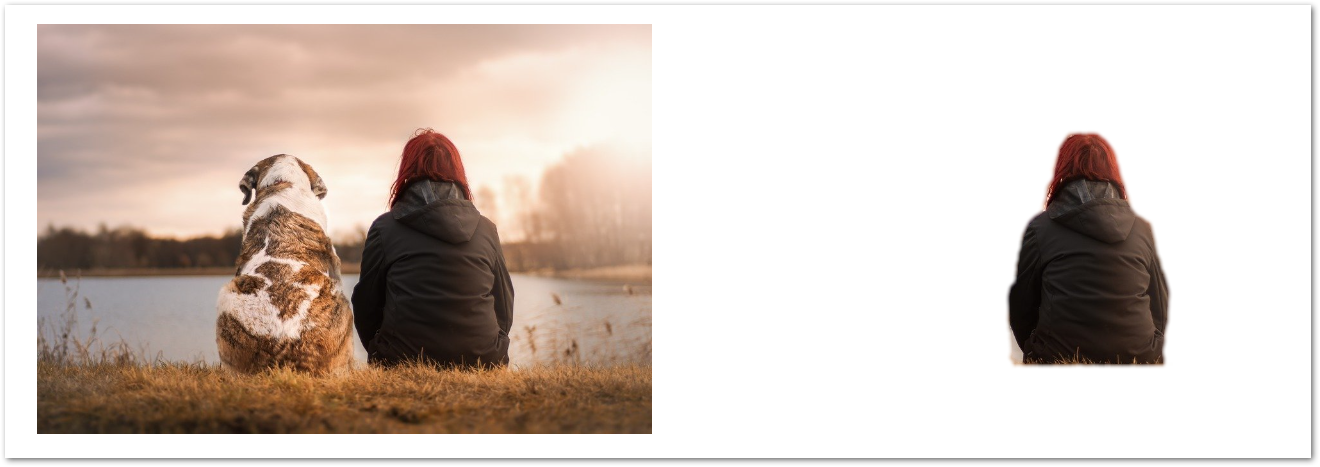
使用指定假定对象数据进行图形剪切自动屏蔽
在这种技术中,特定假定对象的数据被用于 AutoMaskingGraphCutOptions 的 AssumedObjects 属性中,并在随后的屏蔽迭代中使用。下面的代码片段展示了如何使用图形剪切自动屏蔽功能和一个假定对象来移除图像的背景。
using Aspose.Imaging;
using Aspose.Imaging.FileFormats.Png;
using Aspose.Imaging.ImageOptions;
using Aspose.Imaging.Masking;
using Aspose.Imaging.Masking.Options;
using Aspose.Imaging.Masking.Result;
using Aspose.Imaging.Sources;
using System;
using System.Collections.Generic;
using System.IO;
string templatesFolder = @"c:\Users\USER\Downloads\templates\";
string dataDir = templatesFolder;
// To improve masking results, data of the specific objects that should be included in the foreground masking result could be provided.
List<AssumedObjectData> assumedObjects = new List<AssumedObjectData>();
// THe object type and the area containing that object should be specified.
assumedObjects.Add(new AssumedObjectData(DetectedObjectType.Human, new Rectangle(0, 0, 256, 365)));
MaskingResult results;
using (RasterImage image = (RasterImage)Image.Load(dataDir + "couple.jpg"))
{
// To use Graph Cut with auto calculated strokes, AutoMaskingGraphCutOptions is used.
AutoMaskingGraphCutOptions options = new AutoMaskingGraphCutOptions
{
AssumedObjects = assumedObjects,
// Indicating that a new calculation of the default strokes should be performed during the image decomposition.
CalculateDefaultStrokes = true,
// Setting post-process feathering radius based on the image size.
FeatheringRadius = (Math.Max(image.Width, image.Height) / 500) + 1,
Method = SegmentationMethod.GraphCut,
Decompose = false,
ExportOptions =
new PngOptions()
{
ColorType = PngColorType.TruecolorWithAlpha,
Source = new FileCreateSource(dataDir + "result.png")
},
BackgroundReplacementColor = Color.Transparent
};
results = new ImageMasking(image).Decompose(options);
// Saving final masking result.
using (RasterImage resultImage = (RasterImage)results[1].GetImage())
{
resultImage.Save(dataDir + "result2.png", new PngOptions() { ColorType = PngColorType.TruecolorWithAlpha });
}
}
File.Delete(dataDir + "result.png");
File.Delete(dataDir + "result2.png");
下面的截图显示了输入和输出图像。
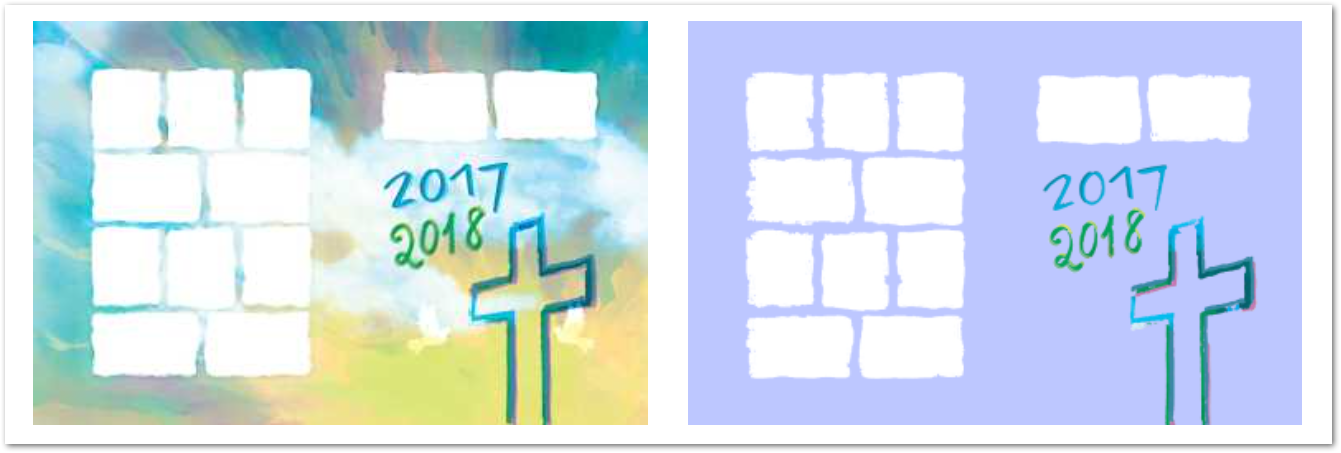
使用手动屏蔽去除图像背景
如果您对自动屏蔽不感兴趣,可以使用手动屏蔽方法去除图像背景。下面的代码片段展示了如何对光栅图像应用手动蒙版去除背景。
using Aspose.Imaging;
using Aspose.Imaging.FileFormats.Png;
using Aspose.Imaging.ImageOptions;
using Aspose.Imaging.Masking;
using Aspose.Imaging.Masking.Options;
using Aspose.Imaging.Masking.Result;
using Aspose.Imaging.Shapes;
using Aspose.Imaging.Sources;
using System.IO;
string templatesFolder = @"c:\Users\USER\Downloads\templates\";
string dataDir = templatesFolder;
string sourceFileName = dataDir + "couple.png";
GraphicsPath manualMask = new GraphicsPath();
Figure firstFigure = new Figure();
firstFigure.AddShape(new EllipseShape(new RectangleF(100, 30, 40, 40)));
firstFigure.AddShape(new RectangleShape(new RectangleF(10, 200, 50, 30)));
manualMask.AddFigure(firstFigure);
GraphicsPath subPath = new GraphicsPath();
Figure secondFigure = new Figure();
secondFigure.AddShape(
new PolygonShape(
new PointF[]
{
new PointF(310, 100), new PointF(350, 200), new PointF(250, 200)
}, true));
secondFigure.AddShape(new PieShape(new RectangleF(10, 10, 80, 80), 30, 120));
subPath.AddFigure(secondFigure);
manualMask.AddPath(subPath);
using (RasterImage image = (RasterImage)Image.Load(sourceFileName))
{
MaskingOptions maskingOptions = new MaskingOptions()
{
Method = SegmentationMethod.Manual,
Args = new ManualMaskingArgs
{
Mask = manualMask
},
Decompose = false,
ExportOptions =
new PngOptions()
{
ColorType = PngColorType.TruecolorWithAlpha,
Source = new StreamSource(new MemoryStream())
},
};
MaskingResult results = new ImageMasking(image).Decompose(maskingOptions);
// Saving final masking result.
using (RasterImage resultImage = (RasterImage)results[1].GetImage())
{
resultImage.Save(dataDir + "result.png", new PngOptions() { ColorType = PngColorType.TruecolorWithAlpha });
}
}
File.Delete(dataDir + "result.png");
下面的截图显示了输入和输出图像。
获取 C# 图像背景移除 API
您可以获得免费的临时许可证,无限制地使用我们的图像编辑和背景移除库。
结论
移除图像背景是图像编辑和设计中的一项重要技能。Aspose.Imaging for .NET 可让开发人员在 C# 应用程序中精确地去除图像背景。本文介绍了加载图像、使用自动和手动遮罩的不同方法实现去除背景以及保存输出图像的基础知识。
通过将 Aspose.Imaging 集成到您的 C# 项目中,您可以简化图像处理工作流程,并在您的应用程序中释放出新的创造力。请尝试使用不同的功能和技术来发掘 Aspose.Imaging for .NET 的全部潜力。此外,还可以联系我们分享您的疑问。


 渝公网安备50010702505508